DESCRIPTION
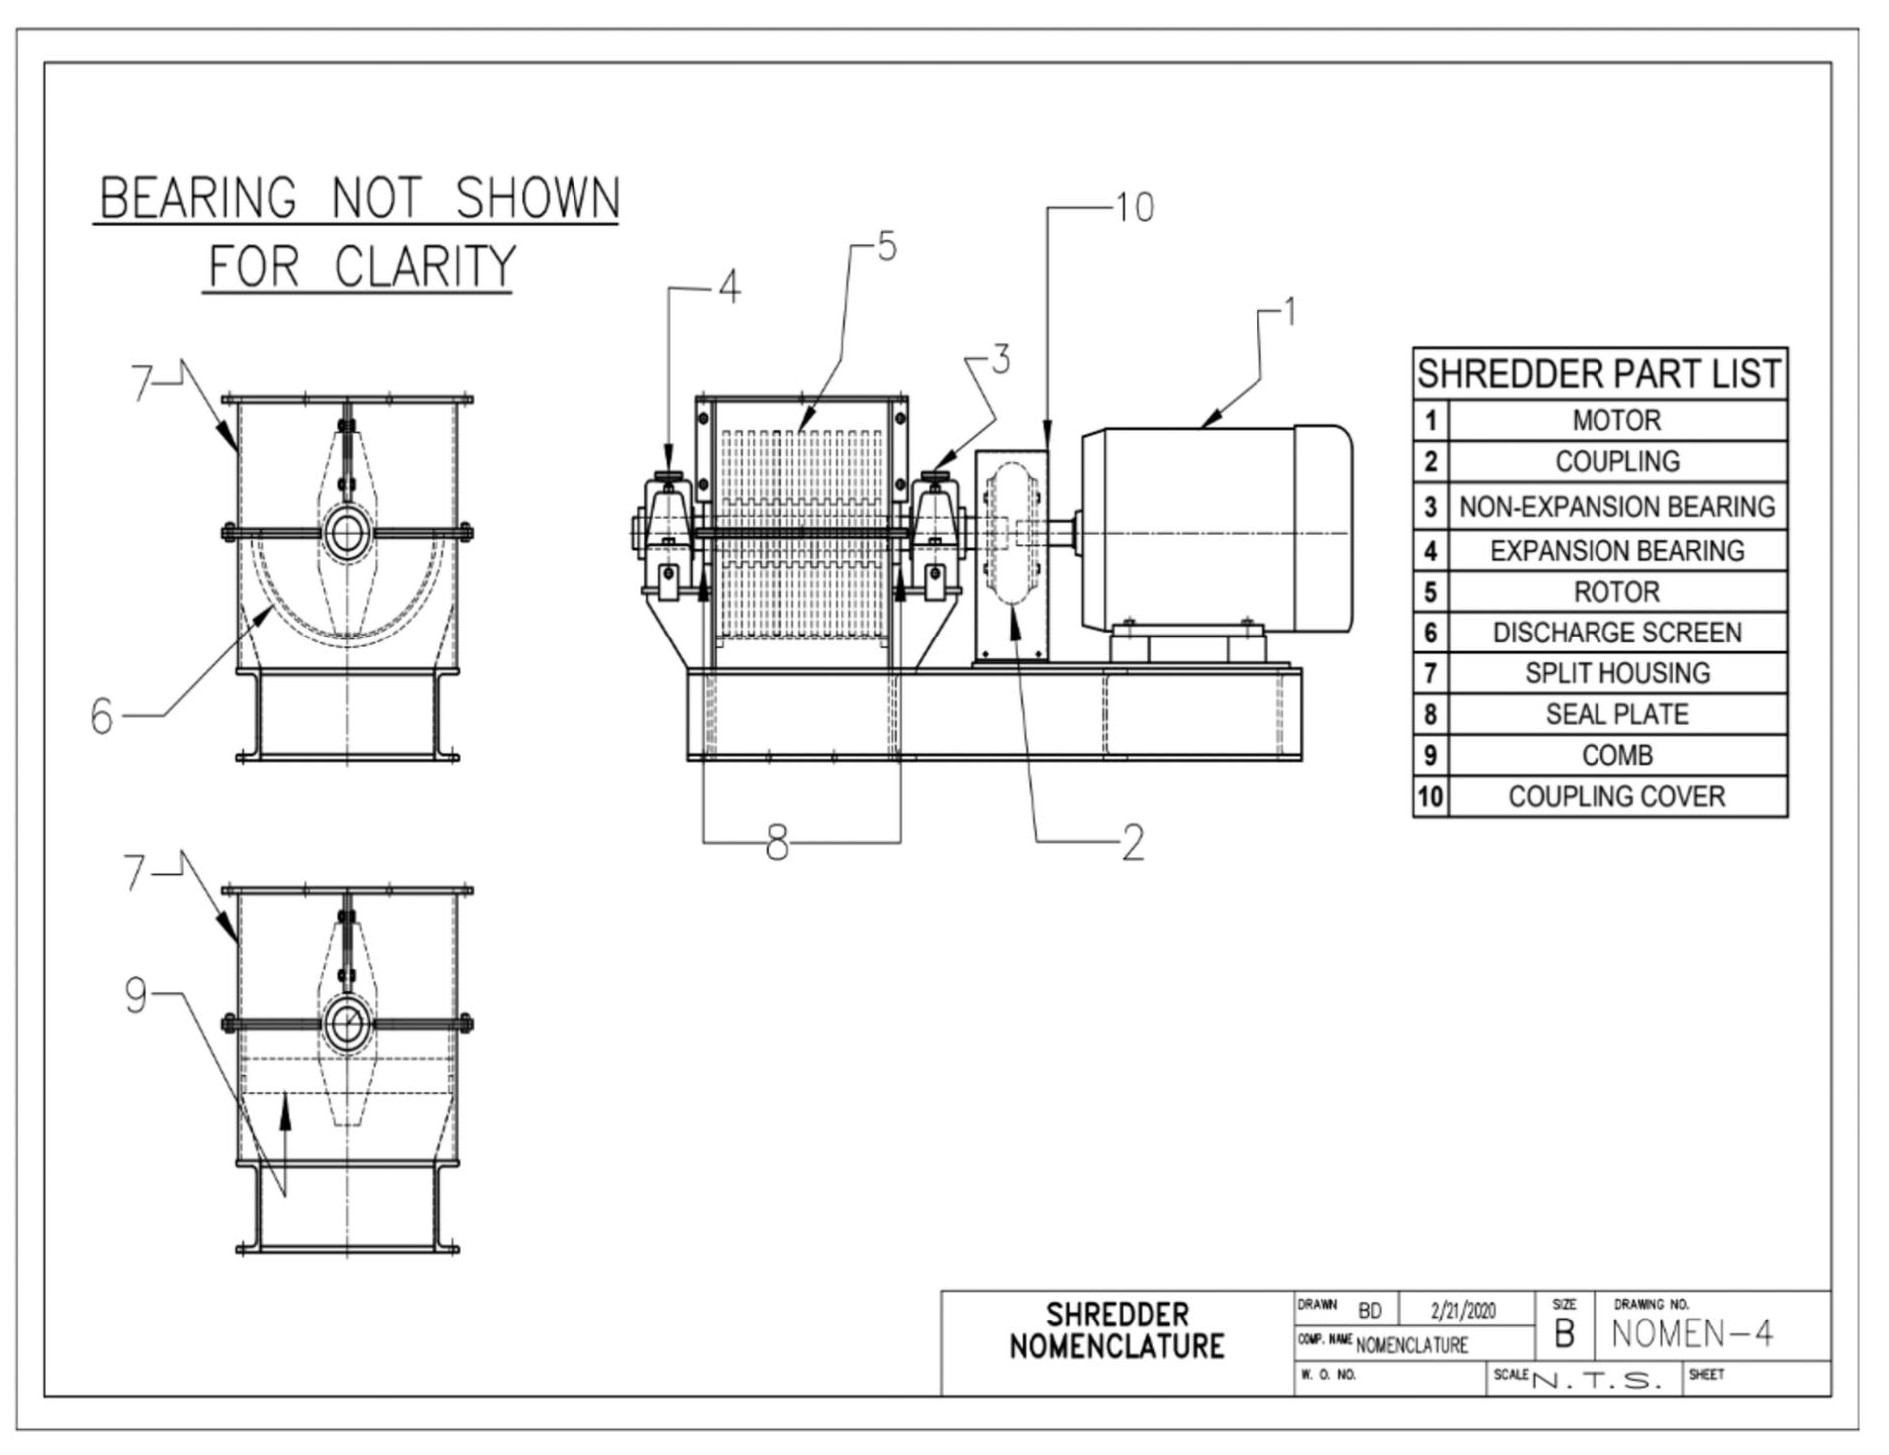
The modern Vincent Shredder is a horizontal machine with a 180° discharge area on the underside. It is ideally suited both to bulky materials, such as whole fruit, and to highly fibrous materials.
The blades, which are fixed, rotate on a horizontal shaft. The rotation of the rotor can be reversed to double the service life of the blades.
The Vincent Shredder is well suited for wet and dry material. Optimum performance is achieved with materials containing either more than 80% moisture or less than 20% moisture.
The shredded material is forced through a screen at the discharge of the machine. A variety of screens are available; different hole sizes are used for different materials. Alternatively, a stationary comb, through which the blades of the rotor rotate, can be installed to achieve a scissors/cutting action. However, this configuration makes the shredder much more susceptible to damage by tramp material.
Shredder housings are split so as to allow ease of changing screens, combs, and rotors. Washing and inspection are also facilitated. The top of the housing is flanged for connection to the chute that feeds the shredder, assuring a tight fit.
The Vincent Shredder is powered by a motor ranging from 10 hp on a small unit to 75 hp motor on a large unit. The motor is direct coupled to the rotor shaft.
Material is fed to the shredder from an overhead chute. It is then torn apart by the rotating blades. The shredded material is either forced between the teeth of the comb or through the discharge screen into the discharge chute.
SAFETY
Please read the entire manual before installing or operating the Vincent Shredder. The general rule of thumb for safety is to use common sense. The following list contains some helpful reminders.
• Keep hands and feet out of the shredder housing at all times
• Do not poke or in any way push material into or out of the shredder
• Do not remove any electrical covers unless electrical service is properly locked out
• Do not wear any loose clothing when around the shredder
• All operators must be thoroughly trained on operation and safety procedures
• All safety procedures of the plant must be followed at all times
INSTALLATION AND MOUNTING
The shredder has been tested, lubricated, and adjusted before shipment.
The installer must provide a substantial, rigid mounting structure, to match the dimensions of the shredder base. General Dimension Drawings are available from Vincent. Supporting members should be firmly anchored to resist vibration during operation. The shredder should be installed level and be evenly supported to avoid misalignment. If the shredder is installed on a structural steel platform, leveling should be done by proper shims at the bolting points.
The following service connections are required:
1) Electrical power for the main drive motor
2) Water hose connection for wash down
ELECTRICAL SERVICE CONNECTION
The shredder motor requires the specified rated voltage at the motor terminals under all operating conditions. Associated safety switches, electrical cables, and connectors are not included. Select and install electrical components that are compatible with the electrical characteristics of the motor and the rest of the plant.
When making the electrical installation, make sure that:
• Appropriate wires and conduit are used for the shredder motor
• Recommendations of the main drive motor manufacturer are followed, especially for the starter heaters
• Finally, all requirements of the National Electrical Code and all local codes are obeyed
START UP
In the case of initial start up after installation of the shredder, turn the rotor by hand to make sure that there is no interference between the rotor and the screen. With direct coupled drives this is done by opening the housing door and pulling on the hammers.
Before starting, check the shredder for the following:
• All bolts are tight and secure
• The housing is locked down
• Drive coupling is properly covered
• No tools have been left in, on, or around the shredder
• The shredder has been mounted securely
• All electrical connections have been made appropriately
• Grease has been applied to the bearings
Start the main drive motor. It is a good idea to listen for knocking noises at this time. If a tool has been left inside the shredder, it will be heard! Hopefully the shredder can be shut down before any damage is done.
Once the shredder is running smoothly without any difficulty, it is ready to process material. Inbound material flow should be set at the minimum rate and gradually increased to normal operation.
SHUTDOWN
To shut down the shredder, first turn off the flow of inbound material to the shredder. Continue to operate the shredder until the material within the shredder has cleared and there is no longer any flow at the discharge chute (probably a few minutes).
CLEANING
As with other equipment, a Vincent Shredder requires proper cleaning during extended shutdowns. In some applications, a shutdown of more than a day or two would qualify as extended. In other applications, an extended shutdown may only be one or two hours. Clean the shredder as needed.
To clean the shredder, stop the feed to the shredder. Turn off the motor and lock out the electrical service.
In some cases, the only cleaning necessary may be hosing down the screen or comb. In other cases, the screen or comb may have to be removed so that it and the rotor blades can both be thoroughly cleaned. These standards are pretty much dictated by the application of the shredder. Care should be taken not to drive water into the motor bearings and drive components.
NOTE: See the bearing lubrication instructions in the maintenance section before putting the shredder back in operation after cleaning.
MAINTENANCE
General Maintenance: All machines require maintenance. If a machine never receives maintenance until it breaks down, then it will do so more frequently. Remember that machines only break down when they are needed most. If a machine is given care and attention, it will still need to be fixed occasionally, but it will almost never break down. This is the purpose of this section.
Bearings: The shredder is furnished with high quality bearings that have been selected by Vincent Corporation for the rated loads of the machine. However, this does not mean that the bearings do not need regular maintenance to have a long service life. A bearing’s life is directly affected by the operator’s commitment and should be checked periodically for signs of impending failure.
There are two bearings on the rotor shaft: a pillow block style, non-expansion bearing at the drive end of the shredder, and a similar expansion bearing on the outboard side of the shredder. Bearings should be periodically checked for having excessive wear, heat, clearance, or damaged seals. Also, whenever possible, check the inner and outer races for signs of rust and/or metal shavings. Do not operate the shredder with a bearing that shows any of these signs. A bearing failure could cause serious damage to the rest of the shredder and result in considerable down time.
The most important part of bearing maintenance is proper lubrication. Use a high-grade ball and roller bearing grease of NIGI No. 1 or No. 2 consistency, with maximum resistance to water washout. Mobil Oil Company Mobiltemp Grease No. 1 or Shell Oil Company Darina No. 2 are both suitable examples.
Bearings should be greased while the shredder is running. One or two shots from a hand grease gun should provide a sufficient amount of grease. Familiarity with the machine will determine the exact amount required.
The time interval from one application of grease to the next can only be determined from experience with the shredder in the environment in which it must operate. The ambient temperature, the temperature of the material being processed, and potential water or corrosive contamination are all factors which influence the frequency of lubrication. Re-greasing may vary from weekly to monthly. If hard jets of water are used during clean-up, it is good practice to re-grease before and after clean-up to make sure the bearing chamber is full.
The application of a small amount of grease at short intervals is much more desirable than large amounts at long intervals. THE COMMON TENDENCY IS TO OVER-LUBRICATE BEARINGS – AVOID EXCESSIVE LUBRICATION. Over-greasing causes damage to bearing seals and can be observed by a rapid build-up of expelled grease on the outside of the bearing seal.
Screen: Installing a new screen is relatively simple. Once the shredder is shut-down and locked out, the top housing is opened. The old screen can then be rotated around the rotor blades and lifted up and out of the shredder. The new screen is installed in the reverse order.
When the new screen is installed, the rotor should be turned by hand as described in the Start Up section. There should be no unusual or rubbing noises. If there is, the screen needs to be checked again to make sure that the screen is properly installed. If necessary the bearings can be realigned using the jacking bolts to prevent interference of the rotor blades and the screen.
Comb: To install or remove the comb requires removal of the rotor (see below). Once the rotor is removed the comb can be dropped into place or easily removed. There are no bolts to secure the comb. It is held in place by the top housing once the shredder is reassembled.
Rotor Maintenance and Removal: The shredder has been designed to operate in both a clockwise and a counter clockwise direction. After the blades have been worn out on one side, they can be rotated in the opposite direction by switching the motor connections. This will double the blades’ service life.
Once both sides of the blades have been worn out, they can be removed for renovation. One option includes milling a rounded corner from each blade so as to form a fresh, flat surface. Alternatively, the blades can be built up with weld applied hardsurfacing. Static balancing is adequate. The modular design allows the spare rotor to be used in its place while repairs are being made. This option can only be done if the blades have not been allowed to wear beyond repair.
When the rotor needs to be removed, start by removing the screen as described above. Release the coupling between the motor and the rotor shaft. Next, remove the pillow block bearings and the seals from the rotor shaft. The rotor can now be removed.
ORDER INFORMATION
Before ordering replacement shredder parts, please refer to the following nomenclature drawing and parts list in this manual. Specify the quantity, part name (and part number, if available, for OEM components), shredder model, and the serial number of the shredder.
EXAMPLE:
(1) drive side bearing
For shredder Model VS-18
Serial #20041-A
Direct all correspondence to:
VINCENT CORPORATION
2810 East 5th Ave.
Tampa, Florida 33605
USA
Tel: (813) 248-2650
Fax: (813) 247-7557
E-Mail: vincent@vincentcorp.com
Click the link below for a pdf version of this page.